Beware Of These Health Risks At Makeup Stores

02164f50-a1c7-4747-8d48-ba94d5b0099b-getty-819592280

I think we all have to agree that one of the most fun parts about makeup shopping is giving yourself a mini makeover with testers. There is nothing more satisfying than finding that foundation that blends perfectly into your skin, or putting on a lipstick that makes you feel super hot.

But have you ever thought about your health when it comes to trying on makeup? Recently, a woman from California is trying to sue Sephora, claiming that she contracted herpes from one of their lipstick testers. Another woman was infected with Staph, which almost became deadly after having makeup applied with dirty makeup brushes.

Those cases should be enough to freak people out. But unfortunately a lot of us don’t think about things turning that severe we try on makeup.

Its been about two years since I started working at MAC, and one thing I have to say is that people need to adopt habits that allow testers to be SAFE and SANITARY. All makeup stores and counters take precaution to keep things clean. However, there is only so much they can do because, not to be rude….but people are disgusting.

Countless times I have seen people put on lip products without spraying and wiping it, people cough or sneeze into testers when they are sick, try on mascara straight from the tube, dig their fingers into cream products, etc. It makes me die a little on the inside.

With that said, how dirty are these products that are sitting out?

A two year study was held by Elizabeth Brooks, a professor at Rowan University where she took swabs from testers at popular make stores and counters to see how contaminated they are. To no surprise, she found E. Coli, Klebsiella Pneumoniae, Herpes Simplex Virus (type 1), and Staphlococcus aureus on the surfaces of the testers. What she also found was that the amount of contaminated products varied on the day of the week. On Saturdays, the testers were the most contaminated due to a higher volume of customers whereas Fridays and Wednesday mornings were the least contaminated.

Here is a condensed breakdown of what these guys are:

E.Coli and Klebsiella Pneumonaie

.Both E.Coli and Klebsiella Pneumonaie are found in the intestinal tract and are expelled through feces. Not everyone washes their hands after going to the bathroom. So when you try on a product without cleaning it, there is a possibility that you could literally be applying and smearing someones s**t onto your face.

Symptoms of an E.Coli:                                             Symptoms of Klebsiella Pneumoniae:

.Abdominal pain                                                               . Fever
.Vomiting                                                                            .Breathing Issues
.Diarrhea                                                                            .Rash
.Fever                                                                                  .Altered Mental States

In more severe cases:
Dehydration
Bloody diarrhea
Kidney failure

Herpes Simplex Virus

We all know what Herpes is. There are two types: HSV1 (oral) and HSV2 (genital). According to Dr. Whitney Bowe, a leading NYC Dermatologist, “You can catch [it] from an inanimate object such as lipstick. In fact, that virus can survive on the surface of a lipstick tube for up to a week.” The reason why I mentioned type 2 is because you can still contact genital herpes orally and vise versa.

Symptoms of HSV:
Tingling, itching or burning of the skin a few days before blisters erupt

Sores- One or more more painful, fluid filled blisters may appear. Blisters break open and often ooze fluid and form a crust before healing. Sores can show up between 2 to 20 days upon infection and can last 7 to 10 days (sometimes longer).

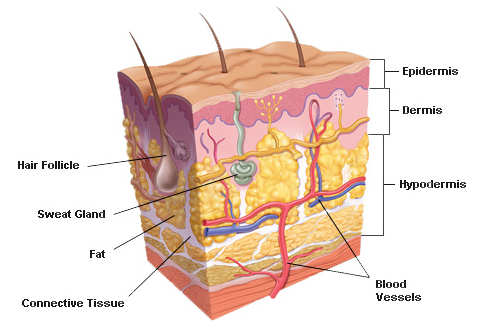
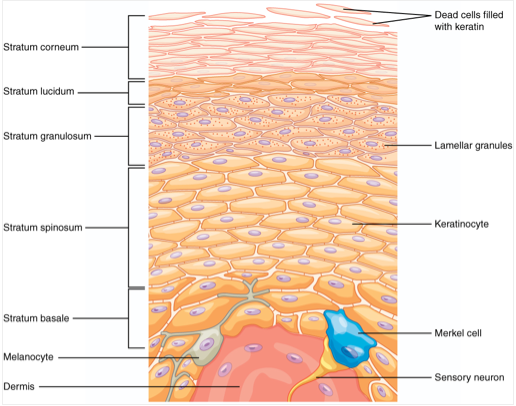
Staphlococcus Aureus

Staph is a bacteria that is already in your the body. It can be found in the respiratory tract, nose, and skin. Although it is not always pathogenic, it is a common cause of skin infections, boils, and lesions (especially if you have a open cut on the skin or if you get it in your eyes).

Symptoms of a Staph Infection:

Boils- occur most often under the arms or around groin or buttocks
Impetigo- This contagious, often painful rash usually features large blisters that may ooze fluid and develop a honey covered crust
Cellulitis- An infection of the deeper layers of the skin which causes skin redness and swelling on the surface. Ulcers or areas of oozing discharge are common too.
Staphlococcus Scalded Skin Syndrome- Results from toxins produced by a staph infection. This affects mostly babies and children but includes fever, rash, and sometimes blisters. When the blisters break the top layer of the skin comes off leaving raw skin that looks like a burn.

How To Test Makeup Safely

.Never apply lip products directly to your mouth without cleaning it first. The lipstick should be sprayed or dipped in alcohol prior to being wiped. If it is a gloss/liquid lipstick, a clean tester applicator should be used to apply. Never ever double dip! The inside of a lipgloss or liquid lipstick is a breeding ground for bacteria growth so once you dip it back in then it is contaminated. Also, saliva breaks down the preservative that’s intended to keep bacteria from growing.

. Any cream products such as blushes or concealers should be scooped out with a clean spatula after having the top layer wiped off and put on a clean surface. After that, you can use your finger to apply the product on your skin. Do not dip your fingers into jars or containers for the same reason as above.

. If you want to try on powder products, make sure the top layer is wiped off with a tissue and the product is applied with a clean brush. Please do not use the sponge that comes with the compact to put it on and then put the sponge back in the container. Thanks.

. Mascara should always be applied with clean tester wands. No double dipping.

. Never apply a tester to an area of inflamed or broken skin

Other Stuff To Consider

. Just wash your hands

. Ask the artist or salesperson to clean the tester for you because they are trained on how to properly clean it. If it is too busy and the artist is juggling a few people, you can always ask for them to set up a sanitizing station for you and you can do your own thing!

. If you are sick and are coughing/sneezing, please cover your mouth with your arm, not your hand, if you are near the testers. Oh and do it in the opposite direction. If your kids are sick, please keep an eye on them so that they don’t cough directly in the testers. I am mentioning this because I see it happen.

. If you have a skin rash then no, we cannot apply makeup on you. We know that you know that its not a good idea.

. Ditch the “it wont happen to me”/ “I don’t care” mentality. Its not just about you, its about others as well.

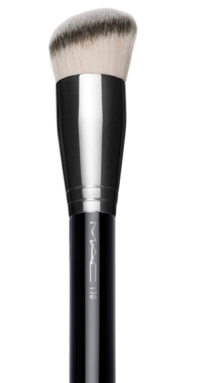
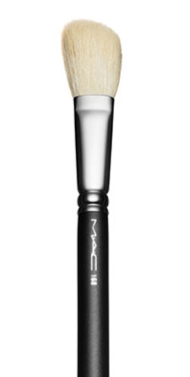
. If you want to see how a brush feels, don’t take it from the wall and open it. The reason why is because that’s going to go on someones face later. So please don’t take offense when we ask you not to do that. Besides, there are tester brushes in an artists belts that you are more than welcome to take a look at if you are curious.

. We. Cannot. Sell. A. Tester. To. You. If. The. Product. Is. Sold. Out. That’s yucky.

To conclude, this article isn’t meant to keep people from playing with makeup. That’s what we want to see when people come by stores or counters. However, we want people do it in a safe way. That is all.

How To Make Your Makeup Look Photoshopped Part 2

Hello again!

Its been a while but I finally kicked myself in the butt and forced myself to finish this.
Last time we left off we just got into the beginning of how to make foundation look awesome, and we just scratched the surface of that subject.

So in this post lets get into a bit more detail of how to make your makeup look its best!
Remember how I really emphasized the importance of skincare in the last post?

Having a skincare routine comes with all types of benefits because not only does it provide a long term solution to whatever the problem is, it also prevents your skin from aging, developing sunspots, acne, redness, etc.

Most of the time people don’t want to take the time to incorporate a skin routine in the morning either simply because they are lazy or they do not want to invest in skincare. But think of it this way; the better your skin looks, the less makeup you need and the better you feel! Makeup can only go so far as to only be a temporary solution.

Also, no matter what your skin type is, everyone needs a skincare routine

But before I go on about that, here is a little mini biology lesson about skin. Because science applies to everything.

screen-shot-2017-05-16-at-4-49-47-pm.png
Up above is a photo that shows the layers of the skin. What I want to focus on is the epidermis, dermis, and hypodermis.

The epidermis is the outermost layer of the skin. It is pretty waterproof and when it is healthy, it prevents most bacteria, viruses, and other foreign substances from entering the body. It also serves to protect our internal organs, nerves and blood vessels against trauma. If we look even closer, the epidermis is composed of five layers which I will elaborate on in a bit.

Underneath the epidermis is the dermis. The dermis is a thick layer of fibrous and elastic tissue which is made up of collagen and elastin which gives the skin flexibility and strength. You also will find nerve endings, hair follicles, sweat/sebaceous glands, and blood vessels in this layer as well. The contents you find in this layer vary throughout the body. For example you have a ton of hair follicles on your head but none of the bottom of your feet.

Lastly there is the hypodermis, which is basically subcutaneous fat. Besides from making you squishy it helps insulate your body from heat and cold and is a storage system for energy.

Okay that wasn’t too bad, right?

Now lets get more into the epidermis (this will be relevant in the end, trust me)

Screen shot 2017-05-16 at 5.31.49 PM.png

For this part, don’t focus on all the terminology in the photo. Instead, I want you to look at the Stratum Basale, which is the deepest layer of the epidermis. This layer is made up basal cells, which are cubodial-shaped stem cells that are precursors for keratinocytes of the epidermis. If you look again at the chart above, the Keratinocyte is shown in the middle and they are cells in the epidermis that produces keratin. All keratinocytes are made up of basal cells, which are constantly going through mitosis to produce new cells. As the new cells keep on forming, the cells that already exist get pushed up towards the the stratum corneum.

Also note that there are no blood vessels in this part of the skin, which makes it avascular.

So lets talk about how this is all relevant.

Regeneration of the Epidermis:

One of the cool things about our skin is that it has the ability to repair and regenerate. The regeneration of the epidermis starts at the deepest layer which is the stratum basal. During the first stage of this process, proliferation of the cells take place. Once that is finished, they continue to divide and move upward to fill in any space that is remaining above. As we age, the rate of cell renewal decreases.

Balanced Diet and Skin Regeneration:

According to an article Discovering The Link Between Nutrition and Skin Aging, “Frequently researched antioxidants such as carotenoids, tocophenols and flavonoids, as well as vitamins (A, C, D and E), essential omega-3-fatty acids, some proteins and lactobacilli have been referred as agents capable of promoting skin health and beauty”

Nourishment of the stratum basal is reached through our blood vessels. Therefore, whatever you eat is directly going to effect your skin. The better you eat, the better your skin looks.

Vitamin C:

Vitamin C, also known as Ascorbic Acid has many benefits for not only for the immune system, cardiovascular system, and respiratory system, but also the skin!

Its benefits include:

. Reduce cellular damage and reduce inflammatory changes to help prevent cancer
. Combats oxidative damage caused by smoking and exposure to tobacco smoke
. Can enhance the effectiveness of sunscreen to protect against UVA/UVB rays
. Enhances production of collagen to help fend off signs of aging such as wrinkles
. Aids in skin repair
. Can also repair and prevent dry skin

Found In: Citrus fruits, broccoli, spinach, kale, parsley, peas, brussel sprouts, cauliflower, and more.

Vitamin E:

Like vitamin C, vitamin E is also an antioxidant. Its main function in skin care is to protect against sun damage. It does this by absorbing the UV light when applied to the skin. Normally, your body can produce this vitamin via sebum that is secreted through your pores. However there are many beauty products today that contain vitamin E in the form of a cream, oil, or supplement (just make sure that you are buying the purest form).

Other benefits include:

. Fades scars and stretch marks
. Repairs damaged tissue
. Treats hyperpigmentation such as uneven skin tone or dark spots
. Promotes healthy hair growth
. Keeps the skin soft and moisturized

Found in: Avocados, almonds, hazelnuts, olives, sunflower seeds, butternut squash, quinoa, etc..

Vitamin A:

Unlike many other nutrients, Vitamin A is a group of compounds that includes its active forms (retinol, retinal, retinoic acid) and other provitamin A carotenoids like beta-carotene. Beta carotenoids and other carotenoids are is the form of Vitamin A we get from plant based foods. When consumed, the body processes it and turns it into Vitamin A.

Benefits of Vitamin A include (through diet):

. Healthy skin cell production
. Stimulates fibroblasts ( the cells responsible for developing tissue that keeps the skin firm and healthy) in the deep layers of the skin
. Protects against infection by aiding in strengthening your skin barrier

Found In: Beef liver, carrots, sweet potato, kale, spinach, broccoli, eggs, butter, etc..

. Though I am talking about getting vitamins and nutrients through diet, I think its also think its important to note the benefits of Vit. A from topical creams since it is a very common thing in the beauty industry.

Benefits Via Topical Cream:

. It clears up acne– prescription creams such as Accutane (a retinoid) are commonly given to those who suffer from severe acne. It works by reducing the sebum production and makes pores less “sticky” to prevent them from getting clogged.
. Evens skin tone and gives you a glow– It can help lighten sun-induced brown spots and boost skin radiance by increasing and normalizing cell turnover. This makes room for healthier cells and allows light to bounce off more evenly. It also may block an enzyme that is necessary for melanin production, leading to a healthier complexion.

Vitamin D

Naturally, there are very few food in nature that contain Vitamin D. Some fish such as salmon, tuna and mackerel contain this vitamin in their flesh. The reason behind this is because your body is actually designed to get vitamin D by synthesizing it in the epidermis when exposed to sunlight (specifically ultraviolet B). This doesn’t mean to go crazy with tanning under the sun because depending on what area of the world you live in, sometimes even just 15 minutes under the sun is enough to get a sufficient amount.

Benefits of Vitamin D are:

.regulates the absorption of calcium and phosphorus
.helps your cells communicate properly
.facilitates the immune system to function normally
.may boost weight loss

So these vitamins that I just talked about are just some of the ones that are vital to keeping your skin looking and feeling its best. I guess I focused on these ones specifically because they are found in a lot of beauty products.There is a long list of other vitamins and nutrients that help as well which is why it is important to balance everything!

Fat Soluble vs Water Soluble

We’re almost done! I need to touch upon this though because it is really important to know.

Vitamins are classified into two groups: Fat soluble and water soluble.

Fat soluble vitamins (A,D,E and K) are absorbed in fall globules that travel through the lymphatic system of the small intestines and into the bloodstream. Once they are stored in the tissues of the body, they tend to stay there. So if a person ingests too many fat soluble vitamins, the result can be potentially dangerous as they become toxic.

Water soluble vitamins (All B vitamins, and Vitamin C) are dissolved in water. They are absorbed more easily into the body and if you do consume too much it is excreted through urine. Not stored. Therefore, these vitamins need to be replaced more frequently.

The tolerable UL (upper level) intake vary depending on age and gender. Here is a chart that displays the recommended daily intake for every vitamin and minerals.

I know that this was a lot to take in one post. But the goal is for you to realize that the more nutrient-dense your diet is and the less crap you eat, the better your skin is going to look and the better you will feel inside.

Until next time!

-Christina

The Honest Answer On How To Make Your Makeup Look “Photoshopped”: Part 1

This post has taken so long to write because I have tried to condense all this information into one page and realized that it’s impossible to explain all at once. So I have decided to break up the subject into a few parts! This way it is a easier to understand and not get lost in miles of paragraphs.
One of the questions I get asked most when I’m at work is, “I love the way your skin looks! What foundation are you wearing?”

I honestly wear everything and since working at MAC I have even grown to love their foundations!

There are a few factors that go into making your face makeup look really milky and smooth. However, what I want you guys to know is that first and foremost, if you do not take care of your skin and watch what you eat, then you shouldn’t expect to look “photo-shopped”. Even if you put on multiple layers of foundation and powder. In all honesty, really good looking foundation starts with really good skin and i cannot stress that enough.

There really is no other way around it, and what I think a lot of people expect from makeup application is a bit unrealistic in terms of what the results are going to be. Sometimes clients will show me a picture of a girl who is so photoshopped to a point where she looks like play-doh and go “can you make me look like this?” After asking a few questions about their skin/skincare and find out that they are super dry and only use toner, and JUST toner, the answer is no.

This is because first off, the skin is so dry and textured that anything you put on it will look flaky. Second, even if I were to add moisturizing products, it still wouldn’t be enough to smooth it out completely without noticing any texture. It takes time for the skin to start looking and feeling better. The more consistency the better the outcome!

But you know what is very interesting?

I find that people spend way more money on makeup to cover up their problems rather than spending on skincare which can actually solve skin issues. People watch videos of beauty bloggers raving about a certain product that they love and think “I need this too.”

People like being told what to buy because these beauty bloggers are doing the work for them. They don’t want to spend the time and money to figure out what works for them either because they don’t feel like it or don’t have the patience to.

Honestly, its  b*****t.

The other person who is behind the camera not only has different skin, but what they also don’t tell you is that they probably spend a lot on skincare and keep up a regular skin routine.. I haven’t watched a tutorial in a while, but from what I can remember not one of the Youtuber’s that I watched talked about skincare first band how they prep it before makeup application.

This is why you can spend $80 on Tom Ford foundation, but at the end of the day, if you don’t take good care of your skin then its going to look like crap. Period.

So get rid of the idea that expensive foundation will be a long term solution to make your skin look better. Get rid of the idea that there is one miracle product out there that will cover everything up and make you look like a real life walking photo-shopped doll.

If you want to make your makeup look the best it could be, start taking time out of your day or wake up earlier to use moisturizer/serums/masks or scrubs (and be consistent).

Im not going to tell you what products you should buy and use, because that is something that should be customized and tailored to your needs. Make sure to take the time to experiment and research what products will work for you. I promise you it will change your whole makeup game!

Also on the plus side, if you have better looking skin, then you don’t need as much makeup to cover things up. Doesn’t it sound more appealing that you can walk out of your house and feel good when you have nothing on?
At the end of the day, its not the actual makeup, its the health of your skin!


P.S  I need to point out that this post is in regards to most people who have less severe skin problems and have manageable symptoms. If a you or another person suffer from conditions such as severe acne, then that is something that should be looked at by a dermatologist.

Brush Basics: The Breakdown of Different Tools, How to Use Them, and Why It Is Worth Investing In Good Quality Brushes

“Ill update my blog tomorrow”…….. is something that I have been telling myself over the last two years and not surprisingly, it has never happened. Honestly I give a lot of credit to bloggers who update their pages every week…finding time is a lot harder than it seems.

I have been working at MAC for almost a year now and one thing that I have noticed is that either 1.) People rarely buy brushes because they’re too expensive 2.) They don’t think they need them or 3.) They do not know how to properly use them

I get it. Brushes are expensive. BUT if you think about the pros vs cons, I think the benefits outweigh the price of a brush for the following reasons:

1. As long as you take care of it, it is going to last you forever
2. Your makeup is going to look better
3. It’s more sanitary (if you are keeping them clean, especially if you use them on others)
4. Depending on the quality, it is going to blend a lot easier and look more flawless
5. You do not need every single brush that is out there to apply makeup on your face..a lot of brushes are actually multi-use so you end up spending a lot less

Going along, here are my favorite tools at MAC and a breakdown of what you can use them for/how to use them

1. MAC #170 Brush: $35

screen-shot-2017-02-09-at-1-04-31-pm

The 170 is made out of synthetic fibers and is densely packed making it perfect for thick cream and liquid foundation. I personally love this brush because it is like having a beauty blender and foundation brush in one! To use this brush to its fullest potential, I hold it from the middle and go in circular motions to have foundation blend perfectly onto skin. I advise to refrain from pumping liquid foundation onto the brush first because it will go deep into the bristles, making it hard to clean.

Considering a beauty blender is $20 dollars and you have to replace it about very three months, I think it makes more sense to have a tool that’s a one time purchase and does the same job.

2. MAC #168 Large Angled Contour Brush: $35

screen-shot-2017-02-09-at-1-24-01-pm

Unlike the 170, this brush is made out of natural goat hair making it ideal for powdered products. Natural hair brushes are porous so they grab on/dispense powder a lot better than synthetic bristles. Also, the angle of the 168 makes contouring extremely easy!

As with any brush I am mentioning on here, I recommend being light handed. So once again you would want to hold it a little bit further away from the head (because the closer you hold it the more pressure you are going to put on it). The reason why I emphasize this is because being heavy handed results in streakier makeup.

For Contour: I would first find the hollow of the cheekbones. Then with the point of the brush facing the ear, i would start at the outer corner and stroke by stroke apply the product, going in an upward motion. Then, I would then buff the product in by using tiny circular motions.

For Blush: I would start at the apple of the cheek, this time having the point of the brush facing the nose and going in an upward motion towards the ear, go in tiny circles or downward strokes to blend the product in.

3. MAC #135 Large Powder Brush: $42

screen-shot-2017-02-09-at-4-54-59-pm

I think this big fluffy brush is a bit underrated. Overtime, while working at MAC i have grown very fond of this brush. What I love about it the most is that it has a slight flat paddle shape making it ideal for sheer washes of powder all over the face. I also like to use it to press powder onto the face instead of swiping it (it makes the liquids or creams stay where you put it instead of moving the product). Also, I do admit to that I have used this brush to apply blush before and I love the way it blends in so nicely and spreads it so evenly.

Using it to apply powder over the face is pretty straightforward. If you want it to be nice and sheer, you can go ahead and use light circular motions to blend it in evenly onto the skin. For more coverage, press it onto the skin and afterwards you can use very light strokes to brush off excess.

Bonus: If you use Fix + after powder application, it will take any powder residue off the face and melt the product down leaving a very natural skin-like finish.

4. MAC #217 Blending Brush: $25

Screen shot 2017-03-14 at 12.18.48 PM

Ahh everyones favorite brush! Why? Because it is the perfect tool for blending powder or cream products on the eye or face. Since it has an oval shape, it can fit into a crease easily (unless you want a more precise crease which in that case you should go for the #221). It can be used for applying and blending out primer, concealer, eyeshadow and even highlighter on the cheek! Of all the eye brushes out there, this one is a staple to have. I like to hold this guy on the further end to apply the slightest amount of pressure. The motion that I use with my hand depends on the product that I pair with it.

In terms of eyeshadow, if you want to build up the crease, I like to start with the windshield wiper motion (going back and forth) for a few times and then go in small, circular motions to make sure there are no harsh lines.

For highlighter, keep in mind that you are concentrating on certain parts of your face so small controlled motions are key to keeping the glow where you want it. Otherwise, you might end up highlighting areas of the face that you don’t want to stand out!

For cheeks: Small circular motions starting at the top of the cheekbone and moving up towards the temple.

For nose, cupids bow and brow bone: Small back on forth motions should do the trick.

In terms of concealer (for under eyes), I’ve noticed that I kind do whatever I feel like. Honestly it just depends on what I am using. For example, something super fluid can be blended out with pretty much any type of stroke. Something a bit thicker might need a bit more work so sticking with circular motions would be better for blending the product onto the skin. Just play around with it and see what you feel most comfortable with!

Was that last paragraph even helpful?…

5.  MAC #239 Eye Shader Brush: $25

Screen shot 2017-04-04 at 1.39.22 PM.png

Along with the #217 is also a staple to have. Why? Because its function differs from a blending brush. The bristles on the #239 are straight, short, and tightly packed for packing color on the lid or outer corner (or anywhere you want to put shadow). It makes your life so much easier giving you the intensity you want in a shorter amount of time. In addition, since it is also a thin brush, you can use the tip to blend out or put on shadow on the bottom part of the eye.

To use it on the lid, PAT the shadow on instead of using swiping motions. If you try to sweep it you are just knocking off the rest of the color and you are not going to achieve the color pay off you are looking for. Start off with a bit of shadow as well and build up the intensity from there. It is always easier to add makeup than to take it off. Once you are satisfied with the amount of pigment, go back with the #217 to blend out JUST the edges. If you try to blend the whole thing, you are just going to diffuse the color.

For blending out the bottom part of the eye use light back and forth motions to gently soften shadow or liner. If you feel like you blended too much just go back in and use the tip of the brush to pat on more color.

6. MAC #266 Small Angle Brush: $20

Screen shot 2017-04-16 at 7.31.47 PM.png

Last but not least, the small angled brush! I use this brush for SO many things. Gel liner, liquid lipstick, brow gel, powder for brows and liner, and mascara for bottom lashes. I think this brush has the most versatility out of all the MAC brushes!

For Powder/Gel Liner: Stamp the color on using the brush to get it nice and dark. Start with the outer color and slowly work your way towards the inner corner doing your best to stay close to your lash line. Try using your pinky to stabilize your hand by resting it on your cheek. I have noticed that my hand shakes less when I do it.

Also: The tip of this brush makes it very easy to build a winged liner! Some people like to start from outward in but I think starting from the base of the lash and bringing it out is a lot easier. Use small strokes again to build the wing out. Take a step back every few strokes to see if you are going in the direction that you want. After you are happy with it flip the brush so that the tip is now facing your temples and slowly bring the liner in.

Lastly, even though it is tough, refrain from pulling on your eye to draw the liner. It displaces your skin so when you let go, it wont even be the same shape. Look sideways into a mirror or close the eye you are drawing the liner on to know where you are going.

(This is actually a lot easier to show people instead of explaining how to do it so I apologize if it gets confusing!)

For Brow Powder: Use the top of the brush to stroke in product going in the direction of the hair. So for the front of the brows, go in an upward motion. For the middle, go more horizontal, etc.. Powder does not define the brows as much as gel does. If you already have hair but want to just fill in a sparse area powder would be ideal.

For Brow Gel: I like to use the top of the brush to apply gel at the bottom of my brow. Using the stroke by stroke method I go along the shape of my brow and then I use a spooley brush to blend the gel upwards into my brows as a way to make it less intense. If you are like me and over plucked your brows when you were younger (RIP), gel is more likely a better option.

For Mascara: Saturate the brush by rubbing it on the mascara wand and apply it on the lower lashes by holding the head of it horizontally. Layer as much as desired to get the intensity you are looking for. Also, I like to rub off any excess product on the back of my hand. Just make sure to clean your brush as soon as possible to avoid too much build up. That way it wont be as hard to clean!

Brush Care:

  One more thing that I want to mention is how to care for your brushes. It is just as important to make sure that you are keeping your brushes clean for not only sanitary purposes, but to prevent shedding and maintaining the integrity of the brush.
There are different way to clean brushes.

 The fast way is to use brush cleaner, like the  MAC Brush Cleanser on a towel and then wipe the brushes back and fourth until the product comes off. It is also an anti-bacterial and fast drying formula so your brushes will be good to go almost immediately after cleaning!

For a deeper clean, you can resort to baby shampoo to gently break down the product build up in the brush. Use lukewarm water to rinse off the shampoo and make sure to lay the brushes down flat instead of up so you don’t loosen the head of the brush.

If you use your brushes regularly, I would say that a deep cleanse should be done once a week.

This is probably a lot of information to take in, but I hope this becomes helpful for those of you who want to invest in brushes and are confused on what to get. I know this also may seem bias because I only talk about MAC brushes. There are a ton of tools out there, and of course MAC isn’t just the only brand that makes good quality brushes. However, as someone who has used different brands, I can say confidently that MAC brushes are worth every penny!


First Post

Welcome!


A while back, I created this blog to discuss beauty trends and tips. I quickly realized, however, that my posts seemed too generic. I wanted to write about something that everyone can benefit from, but didn’t seem like it came straight out of a magazine. As a former Biology student, I know how to turn scientific research into clear, tangible language anyone can understand. Therefore, my (relaunched) blog is my way of uniting my two passions: science and makeup/beauty, that applies to men, women, or anyone.


Please feel free to contact me for topics that you would like me to discuss in my blog!